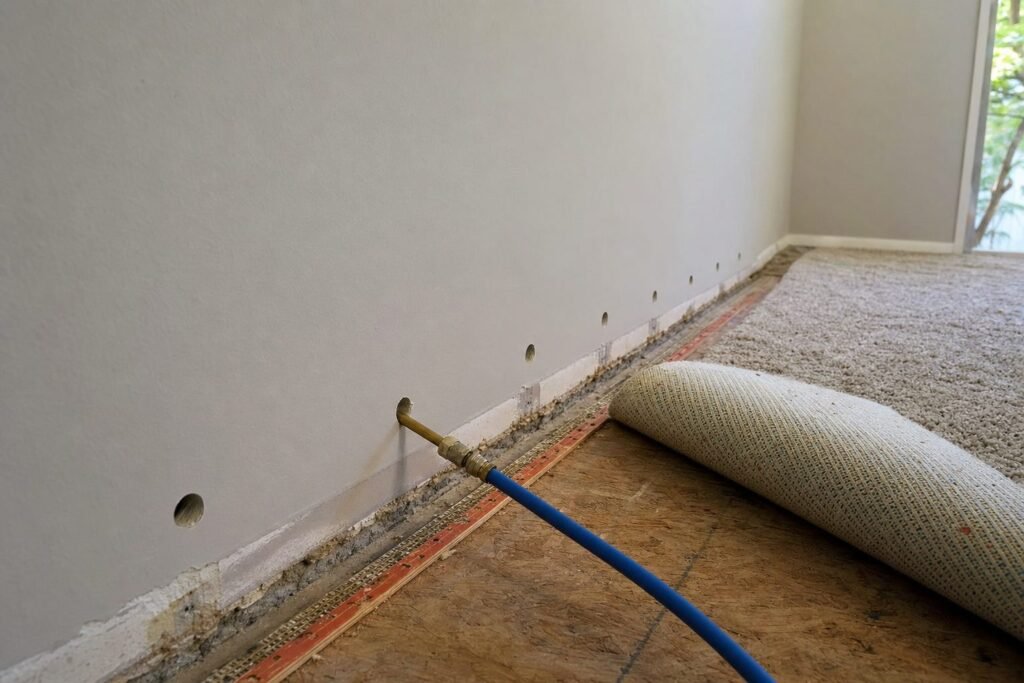
How to dry inside wall cavity
To dry inside a wall cavity, the wet area must first be located and the wall construction identified. Small openings behind removed base trim can allow controlled negative or positive pressure drying when the cavity is clean, reachable, and measurable. If insulation, multiple wall layers, contamination, or poor access blocks airflow, opening part of the wall is often faster and gives a more verifiable result.
How to dry inside wall cavity is not answered by placing a fan in the room. A stud bay is enclosed by drywall, framing, insulation, electrical boxes, and blocking. Water can enter from above, below, or behind the wall and move along framing. The page is part of our difficult drying situations guide because the real work is reaching the wet layer without making unnecessary openings.
What injection drying does in a wall cavity
Injection drying uses small, controlled openings to connect a wall cavity to a system that moves air. With positive pressure, dry air is pushed into a cavity and exits through a managed route. With negative pressure, air and moisture vapor are pulled from the cavity through an extraction point. Both approaches aim to replace humid air at the wet materials with drier air so evaporation can continue.
These systems work on air pathways, not on a promise that every hidden surface will dry. A cavity packed with insulation, blocked by horizontal framing, divided by fire blocking, or interrupted by cabinets may not communicate from one opening to another. The equipment may move air through the easiest route while leaving another wet section untouched.
Before choosing a method, the wall needs a moisture map. Readings near the base, around openings, and at unaffected comparison areas help show where the wet zone begins and ends. Thermal patterns can identify temperature differences that merit checking, but they do not replace material readings or access to the cavity.
When can a wall cavity be dried without opening the wall?
Drying through access holes is most practical when the water is clean, the cavity has a known construction, the wet zone is limited, and the affected materials can be measured over time. Removing base trim can provide a discreet area for a drilling pattern near the bottom plate. Holes may be positioned between studs or at several locations when the water path requires separate access, then managed as part of the drying setup.
The desired result is not merely air movement; it is a drying trend toward the dry standard of an unaffected control. If moisture readings decline at accessible points and the cavity configuration supports airflow across the wet materials, limited access may avoid a larger opening. A wall that received water from a wet floor still requires the floor assembly to be addressed; see drying under tile and stone when the finish traps moisture below.
Negative pressure versus positive pressure
Negative pressure pulls air out through a connection to the cavity. It can be useful where the goal is to draw moist air from a known void and keep that air from being pushed into the room. The extraction route must communicate with the wet portion of the cavity; pulling from one point does not guarantee that air crosses every stud bay.
Positive pressure supplies dry air to the cavity. It can encourage air to move through an open or connected void, but the outlet path must be controlled. Without a planned exit, air can escape at unrelated gaps, and the actual wet zone may receive little useful exchange. In either setup, room dehumidification is necessary to remove the water vapor being released.
- Positive pressure: introduces dry air where there is a reliable path through the affected cavity.
- Negative pressure: removes humid air where an extraction point can communicate with the wet materials.
- Open-wall drying: exposes the actual materials when insulation, obstructions, contamination, or stalled measurements make injection ineffective.
When opening the wall is faster
Opening part of the wall is not a failure of drying. It can be the shortest path to the wet insulation, drywall backside, plate, and framing. It also makes it easier to remove porous materials affected by contaminated water and to inspect for water that moved sideways beyond the original visible mark.
Opening is commonly considered when insulation is wet, the cavity is packed or blocked, the water source affected several bays, or there is no repeatable way to measure progress. It may also be appropriate when water has traveled behind kitchen cabinets or other fixed finishes. For that floor-level condition, see drying behind cabinets and kitchens.
Drywall can sometimes dry when the cavity is accessible and the core has not been compromised, but the paper face and gypsum core have limits. Softness, crumbling, swelling at the base, or prolonged wetting change the material decision. The aim is to preserve materials that can return to stable condition, not to keep a wall closed at all costs.
How to read the drying progress
Readings should be taken at repeatable locations and compared with an unaffected area built from the same materials. A single surface reading is a snapshot. A documented downward trend, paired with stable humidity control and access to the wet layer, is stronger evidence that the cavity is drying.
Stalled results deserve investigation. The air path may be blocked, a second water source may be active, or the wall may contain a material that needs removal. More equipment does not correct an inaccessible wet layer. The drying method should change when the measurements show it is not reaching the material.
Do not drill blindly near electrical wiring, plumbing, or structural components. Wall construction and utility locations need to be identified before access points are made.
Related questions
Can a fan dry water inside a wall?
A room fan can dry the wall surface and improve the room environment, but it does not create airflow through a closed cavity. Targeted access or opening the wall is needed when the wet material is behind the finished face.
Where are wall-drying holes placed?
They are commonly placed in a controlled pattern behind removed base trim or at other nonprominent access areas after the wet zone, studs, and utilities are identified. Placement depends on the wall’s construction and water path.
How do you know if the cavity is actually dry?
Use repeatable material readings, comparison with unaffected control areas, and confirmation that the drying setup reaches the relevant cavity sections. A dry painted surface or a normal room odor is not enough to verify the layers behind it.
If you suspect water has entered a wall but do not know how far it traveled, request a wall-cavity moisture assessment. The next step is to map the wet area and choose between targeted injection access and a direct wall opening.